How To Update A Bathroom Countertop
There are a lot of great products out there, as you wander the aisles of the hardware store. But how do you know if they will do what they claim they will do? I'm always glad to find someone who has tried it and can say what worked and what didn't. Plus — a painted bathroom sink and countertop, no sealer required? That sounds like a perfect makeover! Come learn from today's holiday guest, Kelli, how she used tub and tile paint to give her 90's integral cultured marble sinks a completely new, modern look (and then keep reading for more ideas for how to update an integral sink and how to use tile refinishing paint) —

Interested in how Kelli's painted countertop is holding up? Read hers and others' follow-up reports here.
This post contains some affiliate links for your convenience. Click here to read our full disclosure policy.
Painted Bathroom Sink and Countertop Makeover
by Kelli from I'm Flying South
Hey there, friends! I am so thrilled to be here with you at Remodelaholic! I'm Kelli from I'm Flying South. I write about all kinds of things over in my little corner of the internet. The blog started as a way to get out all of my feelings surrounding our move from Michigan to Florida and transformed into the chronicles of life as a SAHM to twins +1 and beating Postpartum Depression & Anxiety. Eventually, we moved back up to Michigan, and now that we're settled into a new house in our beloved Mitten State, I'm sharing all of the work that my husband Brian and I are doing to make our new home feel more like ours .
Luckily, our new home was fairly turn-key aside from needing a few appliances. Built in the 1990s, the house is full of cultured marble and shiny, yellow brass. It was a foreclosure that the bank came in and fixed up a bit with new carpet and fresh peachy-beige paint on every square inch of the walls, making it clean and very livable. While the colors and fixtures are not aesthetically our taste, we have been able to take our time making it our own. If you want to check out my first big victory over the peachy-beige paint, feel free to wander over to my blog.

One of very favorite projects so far is our painted Bathroom Sink & Counter Makeover. It was a fairly quick, easy, inexpensive update that made a HUGE difference in the feel of the rooms. After a little water leak incident in the basement, we decided that the old, swiveling, shiny yellow brass faucets in both our half bath and the boys' bathroom had to go. And while we had the faucets off of the counters, we might as well paint the counters like I'd been planning!

So let's walk through the process of the painted bathroom sink and counter, shall we? The half bath counter was a beige marble-ish. Nothing terrible, but just not our style either. And after painting the walls (Pantone Illusion Blue – Valspar) and the cabinet (Blue Coal – Valspar) and changing out the cabinet hardware, the counter was just screamin' for a makeover.
First up, supplies:
Affiliate links are included in this list for your convenience. See our full disclosure here.
- Rustoleum Tub & Tile kit
- 4-inch paint roller (& tray if desired)
- fine-bristled paint brush
- craft sponge brushes
- Comet
- sponge
- Lime Away
- abrasive sponge
- tack cloth
- 400-600 wet/dry sandpaper
- bucket
- lots of elbow grease!

Painted Bathroom Sink and Countertop Makeover – Getting Started
Remove your faucet and any old caulk from the counter. Scrub the sink and counter with comet and a sponge and rinse well. Then scrub with Lime-Away and an abrasive sponge; rinse well. Next up, sanding. Sanding is pretty important, as this is how you're going to get your surface nice and grabby for the paint. I'll be honest, 400 grit sandpaper felt like I was just caressing the surface of the tile. So I went rogue and grabbed some 320 from the garage. The 320 felt like I was actually sanding something rather than giving the tile a nice massage.

Sand, sand, sand till your arm feels like it might fall off. The sanding creates a really fine white powder all over the surface, so wipe with a damp cloth a few times, then wipe with a dry one. Finally, I let the surface air dry a bit to be sure that it was completely dry. Tape any surfaces that you might not want to get the tile paint onto (walls, vanity, etc).
Now it's time for some epoxy! I'll admit that sometimes I'm not the best at following directions. Sure I read on the box and from several websites that this stuff was stinky, but I wasn't prepared for just how stinky it actually is. I now have no nose hairs left. (Kidding. Kind of.) I had windows open and fans on and the kids were shipped off to Grammy's house for a sleepover, but I just figured that an N95 mask would dothe trick. Um, no. I lasted approximately 3 minutes until I sent my husband to Lowe's for a respirator! Apparently it takes more than the manufacturer and several testimonials to convince me to save my brain cells.
Painting the countertop is actually pretty easy. A painted bathroom sink was a bit more tricky, but still not terrible. The Rustoleum box recommends using a 4 inch roller with foam cover and a very fine bristled brush for the edges. First, I used the fine bristled brush to cut in around the edges of the counter. I actually did the entire first coat with a brush instead of a roller. I found it much easier to get a nice thin coat on with a brush.

Painted Bathroom Sink and Countertop Makeover – Beware of Bubbles!
The above photos are actually of the first coat in the boys' bathroom, because it's the one I started … and it's just … better. My husband and I each started one sink and someone got kicked off of his project because **cough**PAINT BUBBLES**cough**. The man just doesn't believe in the whole tried-and-true "multiple, thin coats" method. But he is insanely handy and awesome to have around, so I'll keep him.
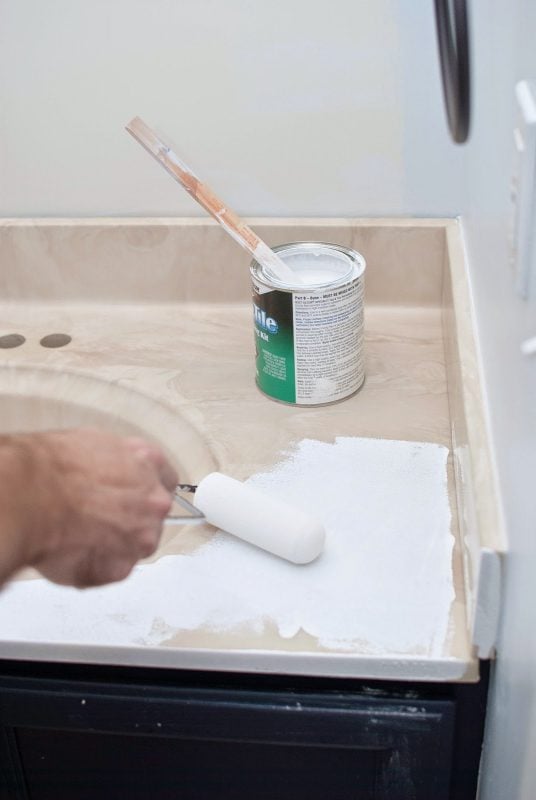
So while I was brushing on my nice thin first coat, Brian went straight for the roller. No brush, just a nice, thick coat with a roller. You know what happens when coats of paint are too thick? Bubbles, my friends. Bubbles.

Painted Bathroom Sink and Countertop Makeover – Brush the edges
Don't do that! By the time I saw it, they were half dry. So, I let it dry, sanded the bubbles down, and went back for the brush! Brush for the edges, roller for the rest. Lather, rinse, repeat.

The trick with this stuff is not to get a super thick layer on there, but not too thin either. Too thick = bubbles and drips. Too thin = weird texture and marks. I started with a thin layer and worked up from there. We let each coat dry for about an hour before starting another coat. The third coat was when I really started to get serious about texture.

Certain areas of the counter and sink were a bit more challenging to achieve a smooth finish – namely the corner behind the faucet and the bottom curve of the sink. For behind the faucet and the tops of the pieces that crawl up the wall, I found that using the foam brush to kind of dab the paint on was pretty effective. The sink just took a lot of smoothing with the roller. Random little bubbles would form and even the thinnest layer seemed to want to drip a bit. After rolling out the imperfections for awhile, we just called it good and decided to let it cure.
The prepping and painting process took roughly 3 hours – 30 minutes for prep, 10 minutes of painting per coat (maybe closer to 20 minutes for the last coat), plus one hour drying time between each of the 3 coats. Rustoleum recommends 24 hours of curing before touching the surface and 72 hours of curing before getting the surface wet. After the third day, in went with this pretty lady
…

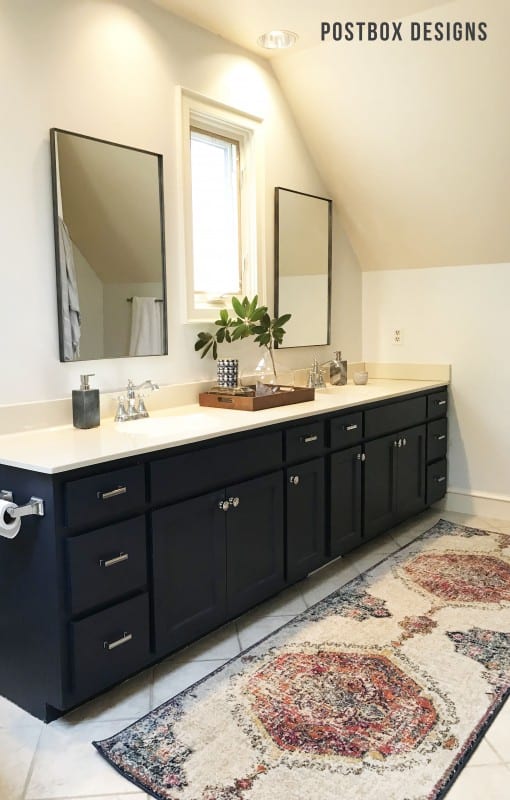
Isn't she gorgeous??? It's the English Country Double Handle Centerset Faucet (in Oil-Rubbed Bronze) by Kingston Brass. Words cannot express how much I love her. It's probably unhealthy to be this in love with a faucet. I'm fine with it!

And I'm so hopelessly in love with the finished products that I don't mind the little bits of uneven texture here and there or the little drip mark in each sink. They are barely noticeable unless you stand at the perfect angle and realllllly examine the whole thing. And I don't do that. So we're golden. For us, it was the perfect budget makeover for our 90s-tastic sinks!
[pinit align="center" url="https://www.remodelaholic.com/painted-bathroom-sink-countertop-makeover/" image_url="https://www.remodelaholic.com/wp-content/uploads/2014/12/how-to-paint-an-integral-sink-and-countertop-400×800.jpg" description="Budget-friendly bathroom update, painted sink and countertop"]

Painted Bathroom Sink & Countertop – Budget Breakdown:
- Rustoleum Tub & Tile – $25.97 at Amazon (and enough for 2 counters & sinks!)
- 4-inch roller and cover – $0 (from our stash)
- Brushes – $0 (from our stash)
- 400 grit sandpaper – $3.97 at Lowe's
- 320 grit sandpaper – $0 (from our stash)
- Comet – $0 (from our stash)
- Lime Away – $3.99 at Meijer
- Sponge – $0 (from our stash)
- Abrasive sponge – $2.99 at Meijer (we used Scotchbrite)
- Tack Cloth – $2.09 at Lowe's
Grand Total: $39.01 – for 2 bathrooms!
(If we didn't have some of this stuff already, we may have spent an extra $20 or so.)
Adding in the faucet from Wayfair ($68.22) brings the total up to $107.23. Still not too shabby!

Getting the room all dolled up for the holidays was a treat, especially now that that counters are so clean and fresh. The half bath is one of the only rooms in our house that is consistently clean. Between 3 little boys, 1 big one, and 3 dogs, someone is always making a mess in some corner of the house, so I try really hard to keep this room clean. It's great for guests and perfect for grabbing a tiny break from the reality of motherhood while I sit in there and pretend to go to the bathroom for 3 minutes just to get some peace and quiet. (Shhh … don't tell my boys!)
Thank you so much for joining, friends. And please feel free to come and visit me over at I'm Flying South to keep up with the rest of our shenanigans!

—————————
Kelli, thank you so much for sharing with us! Such a nice budget-friendly update to those 90's sinks!
And, as promised — more bathroom updates!
You can update your integral sink with concrete — tutorial here.

Or, if you've got outdated tile instead of a sink (or in addition to, since these things seem to travel in flocks!), you can paint the tile in your bathroom or shower as well!
Remodelaholic is a participant in the Amazon Services LLC Associates Program, an affiliate advertising program designed to provide a means for sites to earn advertising fees by advertising and linking to amazon.com. Please see our full disclosure here.
Filed Under: Bathrooms, Before and After, DIY, Guest Bloggers, How To, Informative, Tutorials Tagged: bathroom makeover, Bathrooms, countertops, Guest Bloggers, Holiday Guest Series, sink, vanity

Cassity started Remodelaholic with her husband, Justin, to share their love for knocking out walls together. Since then, Remodelaholic has become a great community and resource for all those wanting to know how to make their builder-grade home BEAUTIFUL on a budget!
How To Update A Bathroom Countertop
Source: https://www.remodelaholic.com/painted-bathroom-sink-countertop-makeover/